
DIY Saint Lucia Crown and Costume (Beginner and Intermediate Tutorials)
/
Since St. Lucy is the patroness of one of our little girls, we’ve had the opportunity to DIY a couple versions of Lucia and her crown over the last few years. The first version was for our girl when she was about 2 years old and could be considered a beginner tutorial using mostly felt.
The second was when she was 5 and requires a little more patience with artificial flowers, leaves, felt, and stretch lace. However, both crowns are relatively easy and can be used for younger or older girls.
Both are perfect for All Saints’ Day costumes, saint reports for school or church, and of course, for the Feast of St. Lucy on December 13th. (Find some lovely ideas for celebrating St. Lucia’s Day at Shower of Roses)
One note about my tutorials…
I'm the kind of crafter who fiddles with something just until it looks right and then sticks it together with whatever works. Consequently, my tutorials are perhaps more vague than some prefer. So... up front... I don't have any more details than what I’ve written. This is it! And I still think that you can do it. Yours will probably look different than mine and that's completely fine. That’s actually how it should be. Carry on!
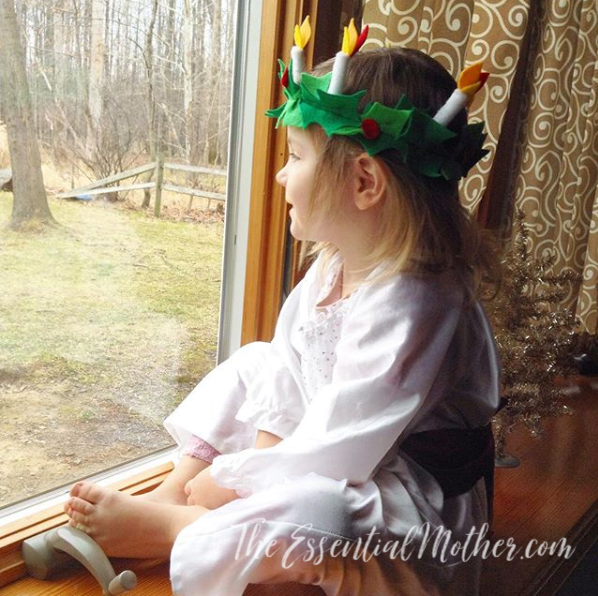
SAINT LUCY CROWN AND GOWN (#1 Beginner Felt)
I initially made this crown while stuck on the couch with pregnancy nausea. Ah, memories! Working for two minutes, pausing to let the waves pass, cutting, stitching, nausea, using some Christmas felt that I already owned... but it worked out nicely.
I didn't use a pattern at the time, just cut and hoped for the best. When a friend asked me to share a tutorial, I said "sure!" That was 3 years ago now… I’m a little slow… but better late than never!

WHAT YOU NEED FOR THE CROWN:
One strip of green felt, 3/4"-2" wide and as long as the circumference of the child's head. (you can find felt-by-the-yard at your local fabric store)
One 2" piece of soft elastic. I used folded over stretch lace similar to THIS. FOE (fold over elastic) is also a great soft option.
15-25 green felt holly leaves. Mine has 17 but I might have made it fuller if I had more time and less nausea. I divided the leaves between two shades of green to give more dimension and also used 4 different sizes of leaves. A template is below for those who need it. Drag and drop into a document and adjust the size to your liking. (Aren’t you just bowled over by my tech brilliance?) I cut mine freehand because I had no patience for tracing and cutting along lines.
Red felt for Berries. Cut however many you want from red felt. I used 5 but could certainly have used more.
White felt for candles. I used five because my girl had a toddler sized head but you can use as many as you like. I used 2" x 3" squares of white felt. Most felt tutorials I have seen have flat felt candles and I wanted mine to be a bit rounder. So I designed these to roll up. You can make these taller or fatter if your child is older or if you just want bigger candles!
Flames. Red, orange, and yellow felt flames for each candle. You don't have to use those colors. I wanted to give a bit more of a dimensional feel to mine so I varied the sizes and colors.
Thread or hot glue (or both). IMPORTANT: You can glue this instead of sewing it. Glue is a wonderful tool for getting things to stay put and works great on felt. However, the last step that I used was a running stitch straight through the length of the headband to reinforce strength and secure everything. You will NOT be able to do that step if you have hot glued everything. That is because you will break your needle and jam your machine! So just choose your path ahead of time.
WHAT YOU NEED FOR THE DRESS:
A white dress or tunic of any kind. This one was a castoff from an angel costume over a white turtleneck. I bought it off a local family for $5.
A red sash. If you want. It’s not strictly necessary. The white of the dress represents purity and the red sash the blood of martyrdom. You can use a strip of satin like I did or any fabric at all. A red scarf or ribbon might also work.

HOW TO MAKE THE FELT CROWN
1. HEADBAND
I started with a simple strip of green felt for the headband. The width can be as wide as you like but mine was about 3/4" since I didn't want any of it showing past the leaves (I’m particular like that) and because her head was small. Measure your child's head around where you want the crown to sit. Use that measurement as the length.
Cut a two-inch strip of soft elastic (FOE, folded over stretch lace, or whatever you have on hand).

You will be attaching the ends of the felt together with the elastic so this has less to do with measurements than it does how it feels on your child’s head. Pin the elastic when it is at a comfortable place on her head (being careful not to pin her head, of course) so that it stretches enough to be comfortable, but it snug enough to stay put. Stitch in place.
2. LEAVES
I made my leaves to look like holly leaves the ones below. It doesn’t have to be holly but it fits nicely with Advent and is easy to reproduce. I made various sizes and a couple different shades of green.
There really isn’t a way to do this wrong. All of God’s leaves look different in nature and yours will, too. If you want to add extra dimension and fullness to your leaves, you can add the following step:
Fold the leaf in half and machine or hand stitch very close to the folded edge through the middle section of the leaf (indicates by the middle lines in my sketch below). When you unfold it, it will look like the middle vein of a real leaf. If you look closely at my photos, you can see the result.

Hand stitch or hot glue the leaves into place around the headband. I stitched mine.
3. FLAMES
I completely forgot to draw you some little flame templates BUT… I think you can figure it out. You will need one red, one orange, and one yellow flame “petal” for each candle. The shape is roughly a tear drop but with a point at both ends.
If you make each color successively smaller, the individual colors will be more visible. Cut these out and make them ready to attach to the candle pieces (below). You can draw your template first but I just cut them all differently. Have you ever seen two flames alike? Neither have I!
4. CANDLES
I used five because my girl had a toddler sized head but you can use as many as you like. I cut 2" x 3" squares of white felt. Most felt tutorials I have seen have flat candles and I wanted mine to be a bit rounder and slightly more realistic. So I designed these to roll up into a tube shape. You can make these taller or fatter if your child is older or if you just want bigger candles!
There is no secret sauce to stitching so that these stay in place. Just use white thread and do what you have to do to keep it all together. If you are a gifted sweet, you will know what to do. If not, just put the needle through until it stays.
You can also use hot glue but that will make it difficult or impossible to stitch onto the headband later. In that case, you will have to use hot glue to affix the candles to the headband.
Before you roll the candle up, stitch (or glue) your red, orange, and yellow flames in the middle of each rectangle… right about where the top of the 3 is on the diagram. After you roll up the candle, your flames will be flickering right out of the top.

After the candles are constructed, arrange them around the wreath and stitch them to the inside. The base with flatten somewhat with stitches and then with the next step.
5. SECURE THE CROWN
If you haven’t used hot glue for anything on the headband so far, you can run a straight stitch right through the middle of the crown to make sure that candles, leaves, and band are all secure. The crown will be somewhat floppy when held (the price to pay for a soft and comfy crown) but should perk right up on the head. Almost done… just one more step…

5. BERRIES
The finishing touch. These are pretty straight forward. Just cut out some circles and glue or stitch them wherever you think they look pretty!

And that’s it! If you end up making this crown, I would love to see the fruits of your efforts. Feel free to send along a photo so that I can ooh and aah over your work (and adorable children).
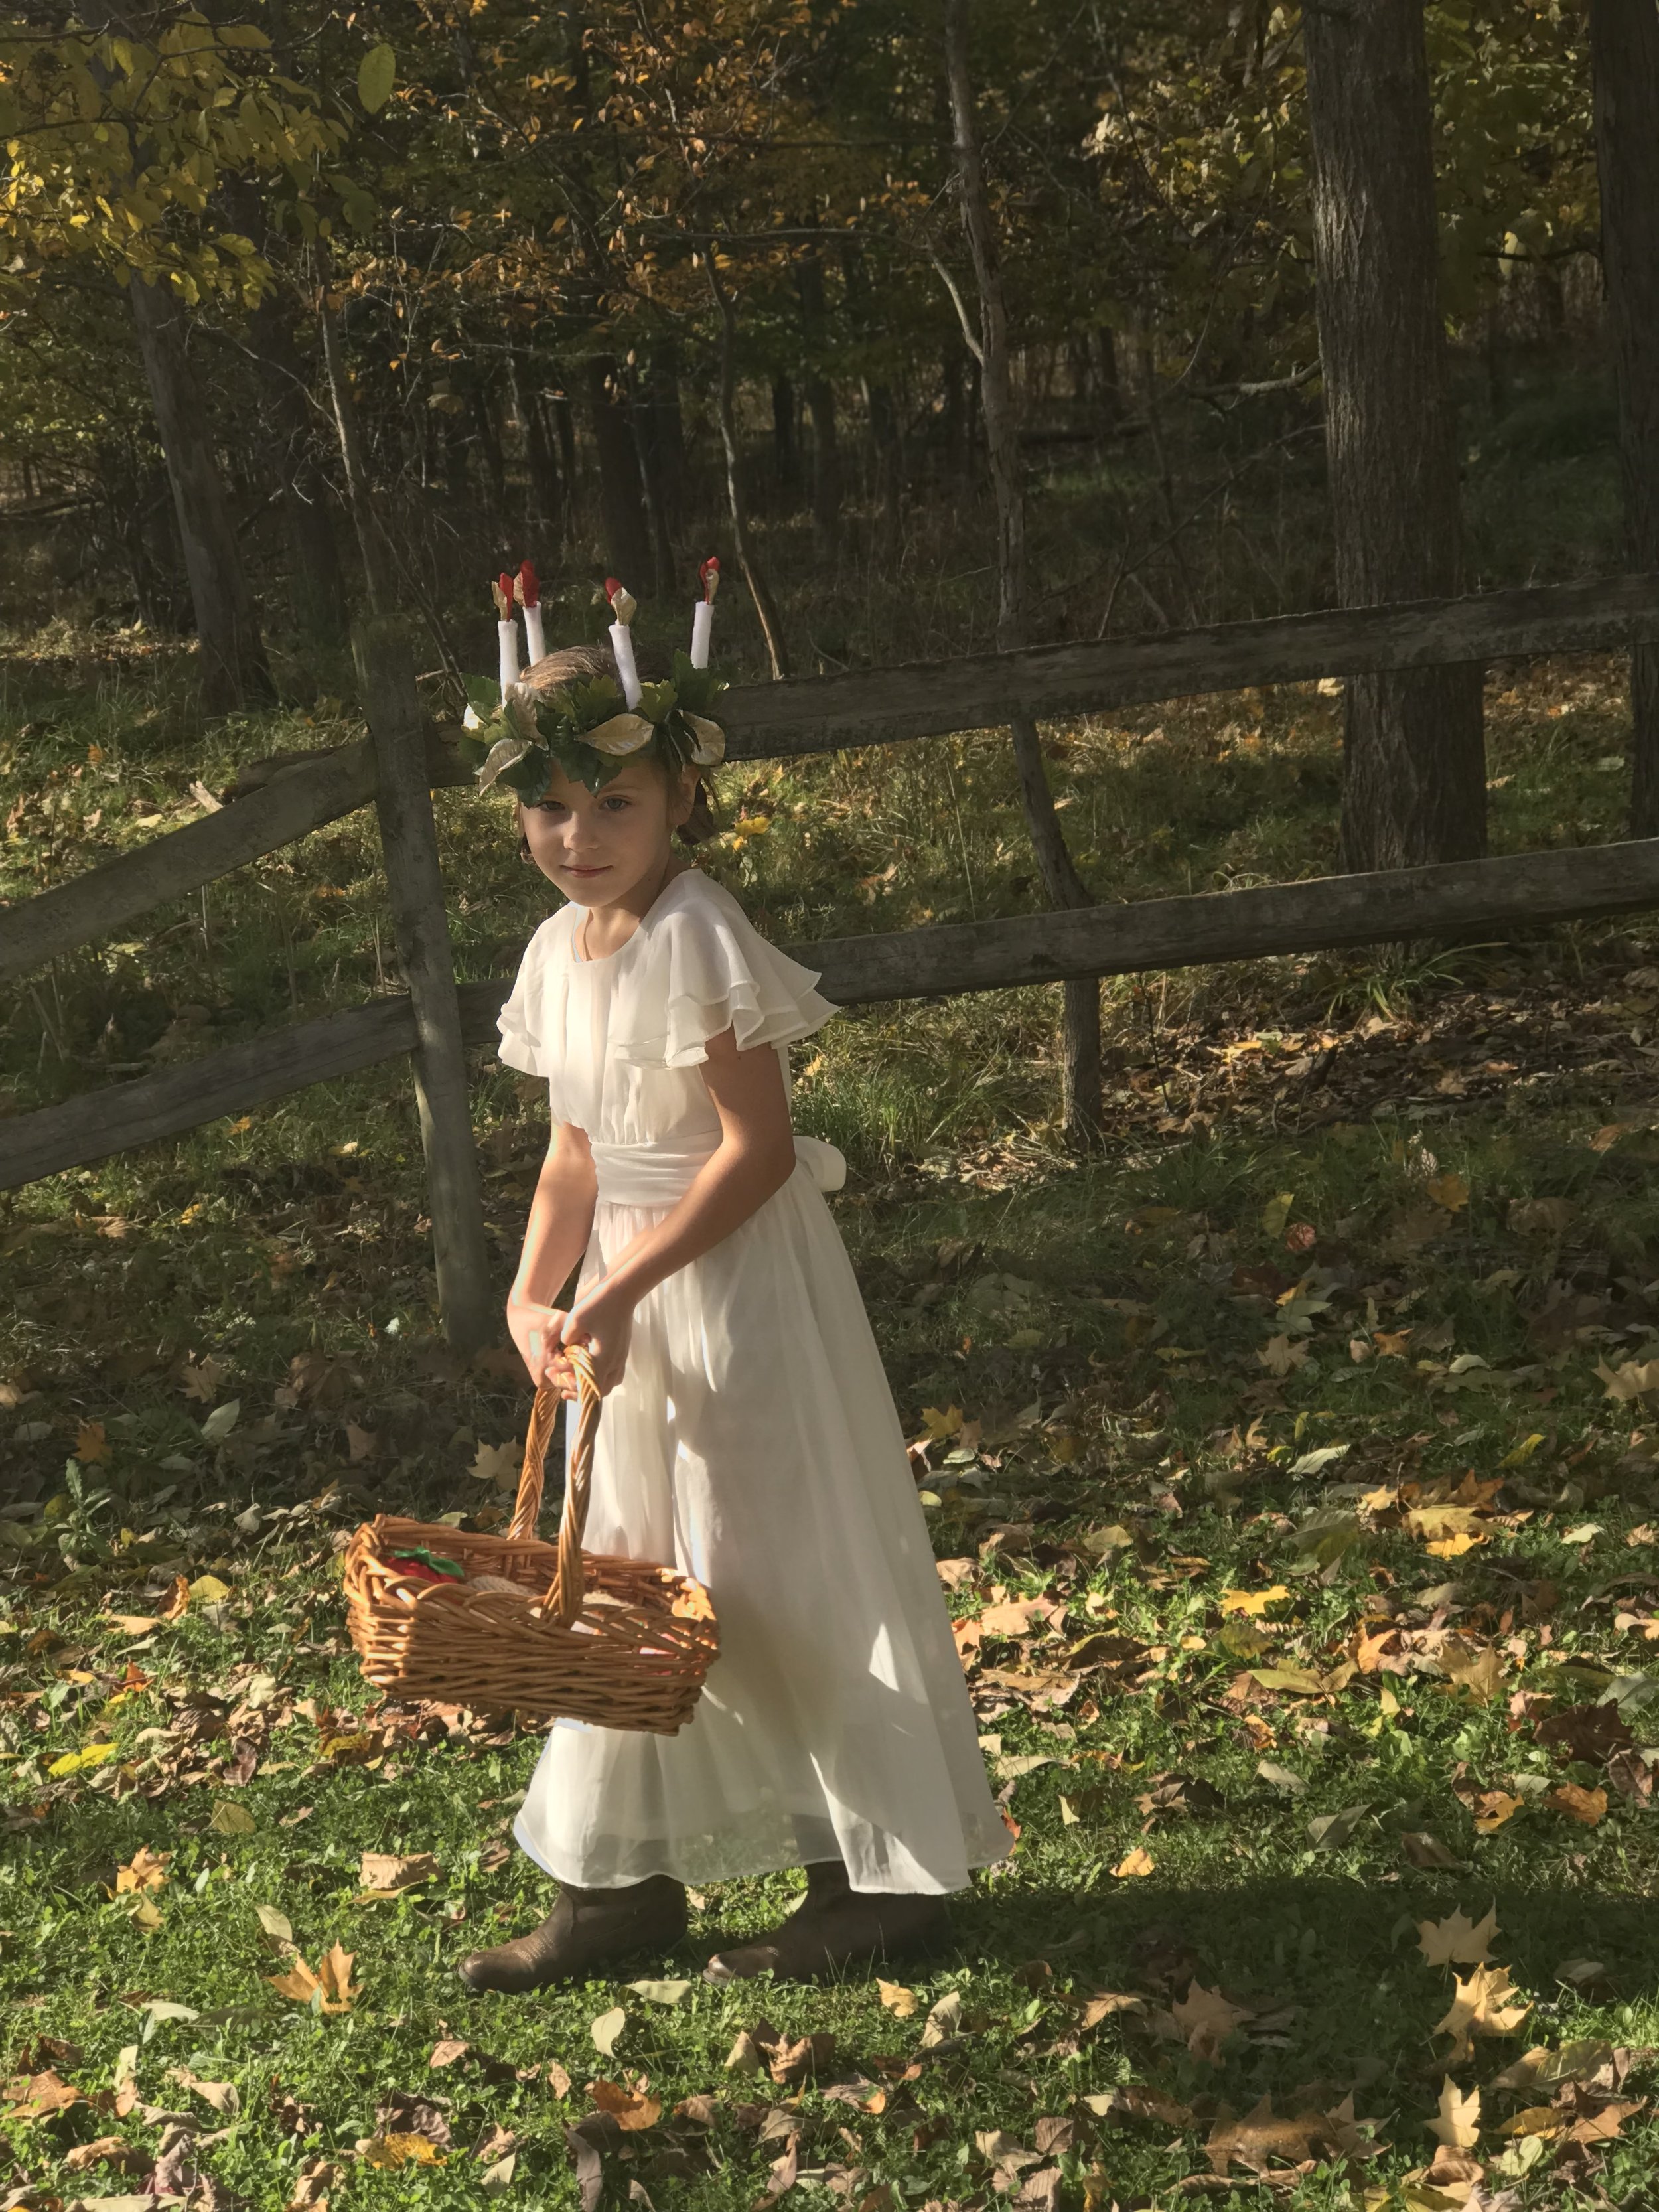
SAINT LUCY CROWN AND GOWN (#2)

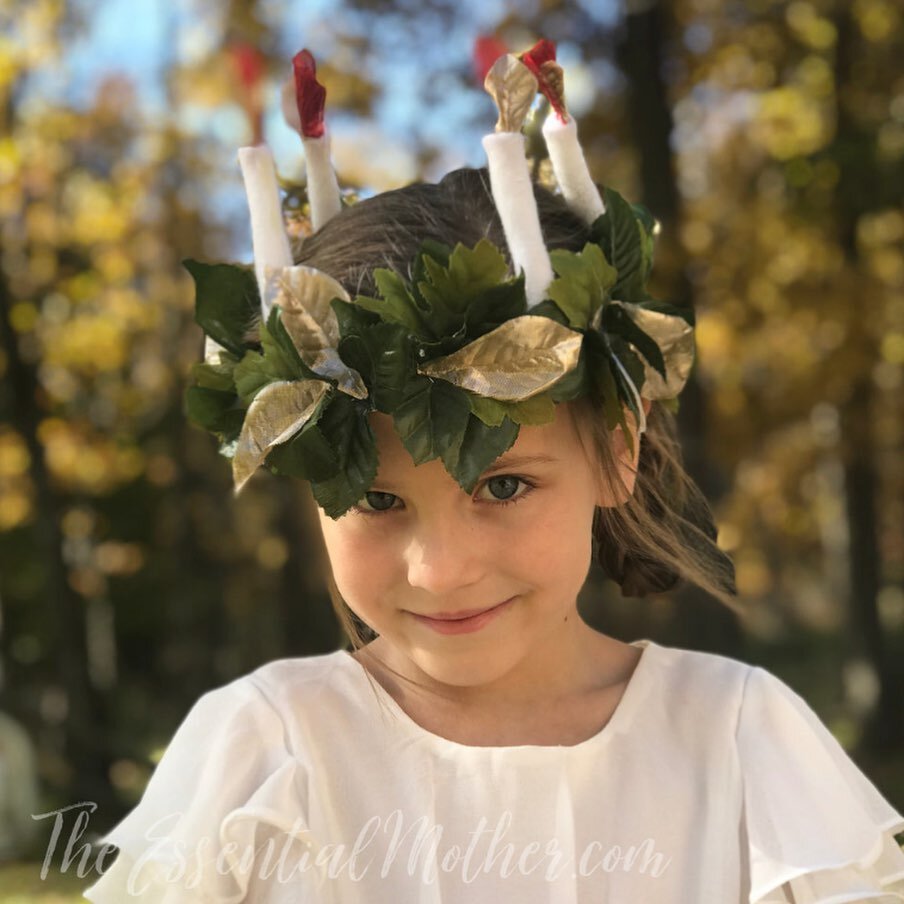
On her 5th All Saints’ Day, she wanted to be St. Lucia again and her old crown was a bit too small. Also (and to be completely honest), I was excited to try my hand at a more mature version using artificial leaves. The challenge this time was that I knew she would never tolerate anything that felt like leaves. It had to be as soft as the felt version or it would end up in my purse.
The crown was a success on all counts. Not only was it simple to pull together (and just as I had pictured it), but it was super soft to wear. In fact, she didn’t take it off even once during the festivities.
Also, this dress was a winner. So modest, soft, and feminine. All the details are below. I give you fair warning… my crown tutorial is loosey goosed. But generally crafty people should be just fine.
WHAT YOU NEED FOR THE CROWN:
Artificial flowers and leaves. I keep my eye out for particularly pretty and unique flowers at the Dollar Tree and then I take them apart. We use them for so many projects that the dollar is always well spent.
I used 4 or 5 different kinds of leaves that I had in my stash plus gold and red metallic leaves that I cut from a bunch of Christmas themed artificial flowers. Use as many as you like. St. Lucia’s crown is traditionally made of evergreen but I never have been one for letting the perfect get in the way of the good so… we use what we have.
Stretch Lace. You can also use elastic but I knew this headband had to be the gentlest, softest base possible for my little sensory sensitive kiddo. This 2.25” lace isn’t exactly what I used but it is similar.
When it isn’t on the head, this crown is super floppy… but it perks right up when it’s worn. The key is to make sure everything is secured with hand stitches in a balanced fashion.
White felt for the candles. You will also need small rectangles of felt to secure the candles to the headband.
Needle and thread
Hot glue. Most of this crown will be hand-stitched but there will be places where a glue gun will be helpful and appropriate.

WHAT YOU NEED FOR THE DRESS:
An Amazon account. I purchased this dress for about $15 after researching the multitude of Chinese companies which sell it. I finally came across this low price (I found it as high as $70 on ebay!) and made the purchase. We will be repurposing it for Easter by dying it a pastel color. It is thin but so classically beautiful and comfy.
Prices are constantly fluctuating on Amazon so the best price I have found recently is HERE for $20 with free shipping. You can bargain hunt by searching “girls flutter sleeve chiffon dress”.
A red sash. We chose to keep it simple this year but it would be very easy to tie a strip of chiffon or satin around the waist.
A note about footwear. My girl wears cowgirl boots with everything. I’m okay with that.

HOW TO MAKE ST. LUCY’S CROWN
Measure the stretch lace or elastic to fit your girl’s head comfortably yet securely. The stretch lace works best if you double it. You can use two layers of 2” stretch lace or fold over a length of 4”. Stitch cut ends together to form the band.
Choose the leaves and petals you’d like to use for the crown foliage and stitch a first layer onto the elastic. This is a little delicate since stretch lace generally has holes in it and doesn’t tolerate a very tight stitch. This is why this is an intermediate project… because you will need to find that fine line between securely attaching and leaving the stretch intact. You will add a second layer at the end with a glue gun or stitches.
Make your candles using the instructions in the previous tutorial except increase the height of the candles for an older child. These are 4” tall x 3” wide rectangles.
I only made four candles because that’s all the white felt I had left. It gave the correct general impression so I was content.
Instead of felt flames, I used one gold and one metallic red petal layered together. I also used a glue gun to make the candles instead of stitching because the candles will eventually be glued to the headband anyway.
Use a hot glue gun to attach the candles to the OUTSIDE of the stretch elastic... where the leaves are. Find places in the foliage where it will be mostly hidden. The hot glue will seep through the inside of the stretch lace (the part that will touch her head). I did not want that scratching her head and I also wanted the candles more secure… so I cut small rectangles of matching felt and placed them on the inside of the headband. When the glue seeped through from the front when gluing on the candle, I pressed on the felt to the inside. (See images below)
Hot glue a second layer of leaves and petals over the first, arranging them to hide the candle base and stretch lace entirely. I made sure that I only glued the second layer to leaves or candles so that no glue would touch the stretch lace. I added a few gold leaves in this layer because… Tolkien made me do it.
Add berries if you like. I had planned to add glittery red berries from a Dollar Tree fine but it looked so pretty without that I just left it alone.
Remember that this crown will be all kinds of floppy until it is on the head. The floppiness was a challenge as I worked with it and I was nervous that it wouldn’t hold up. But… it’s perfect.


If you’d like to show off the results of your own crafting, I’d love to see your pictures! Feel free to email them to me so that I can give thanks to God with you for His work through your hands.